This Apple note-taking application is designed for creating lists, jotting down quick ideas, making checklists, saving images, scanned documents, etc. Plus, you can sync all your devices with iCloud so you can check your notes at any time. Enjoy and see here in our article that teaches you how to add attachments to iPhone, Mac, and iPad notes.
How to use Apple Notes to collaborate with others
First and foremost, you need to make sure your device is ready for collaboration. Follow these steps:
Update your device to the latest software version to be able to use the latest features; Configure iCloud on your device; Sign in to iCloud with your Apple ID.
Also, it’s very important that the people you share notes with also update their apps and devices. They must also be logged in to their Apple ID in order to view and edit their notes.
How to share a note
First, you can either send someone a copy of your note or collaborate within the same note. In this regard, you will need to share your note or receive an invitation from someone else to collaborate on their note. See how it works:
Open the Notes app;
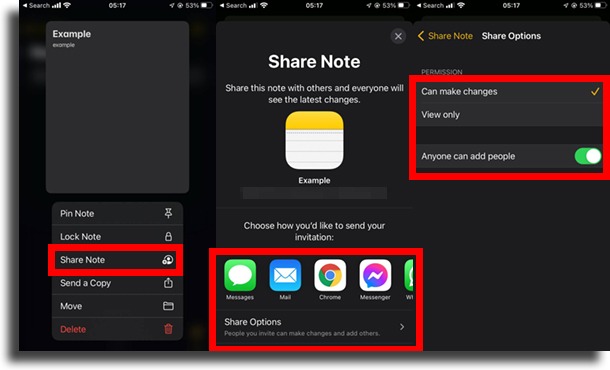
Tap the note you want to share, then tap Share Note. If you are inside the note you want to share, simply tap the ellipse icon (…), then select Share Note.
Choose from the available methods to find out how you want to send your invitation;
You can send it via Email, Messages, or other messaging platforms on your device. You can also choose to copy the link into Apple Notes and submit it manually. Just tap Copy Link, then add the contact details of the people you want to share the note with.
Tap on Sharing Options;
Choose whether the people you invite can edit the note or view only, and thus only have read-only access. You can also share entire folders in Apple Notes so you can ask people to collaborate on multiple notes. It is important to know that it is not possible to collaborate with a blocked note. These have a lock icon at the top of the note and next to the note title. To remove the lock, long-press the note, then select Remove lock.
How to see the changes other people have made to your notes
With the Note Highlights feature, you can see the changes made to a note, along with who modified it and the date and time the change was made. The highlighted text will be color-coded according to the contributor who made the modification. Just swipe right from anywhere on your note to see these highlights.
Get updates with Activity View
Activity View provides a list of each contributor’s activities, as well as a summary of edits made since the last time you viewed a note. That way, it’s easier to keep track of every change in a note. To do this, follow the steps below:
Tap the Shared icon at the top of the screen; Choose to show all activities or tap the ellipse icon (…), then tap Show Note Activity.
Collaborate better with mentions
You are already familiar with this feature from its use on other messaging platforms. It works the same in Apple Notes. It’s very simple, just type an @ and choose from the suggested names of contributors.
Other Apple Notes Features
1. Tags
Tags are yet another new feature that came with iOS 15 and iPadOS 15, making it the fastest and most flexible way to categorize and organize your notes. Here’s how it works: You add a hashtag symbol and keyword directly to the note, or you can create a folder and add a tag to it. This is a way to help you look up your notes and information later and find them quickly. To start a note with the desired tag, you can either tap the tag and start a note, or start a note and add the tag manually.
2. Create tables
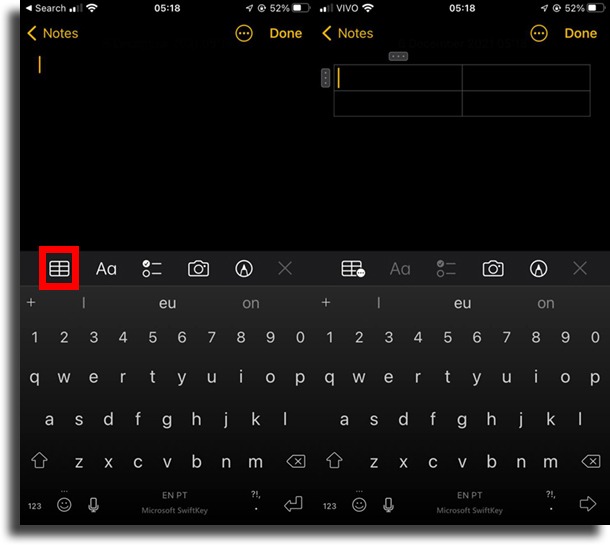
This is not a new feature, but few people know about it. First, you need to tap the table icon located above the keyboard. You can include tables in Apple Notes with infinite rows and columns, edit cell text one by one, add or remove rows and columns as well. At some point, the spreadsheet may be larger than the screen, but it is possible to view its contents with the help of the scroll bar.
3. Scan documents
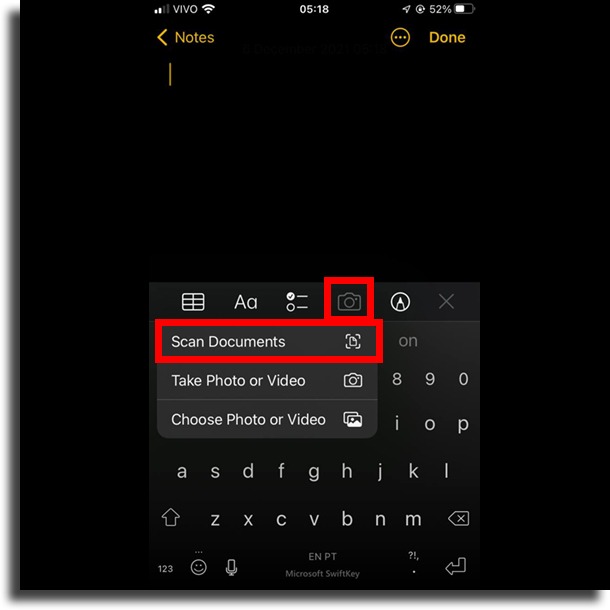
Another nice feature of Apple Notes is the ability to scan documents. It’s very easy, just tap on the camera button, located above the keyboard, and then on “Scan documents”. The device’s camera will trigger for you to capture the image. An auto-framing tool will identify the page and highlight the image that will be captured. Click “Keep Scanning” to insert the file into the note. You will then be able to edit the image, and you can change the color and rotate it.
4. Draw freehand
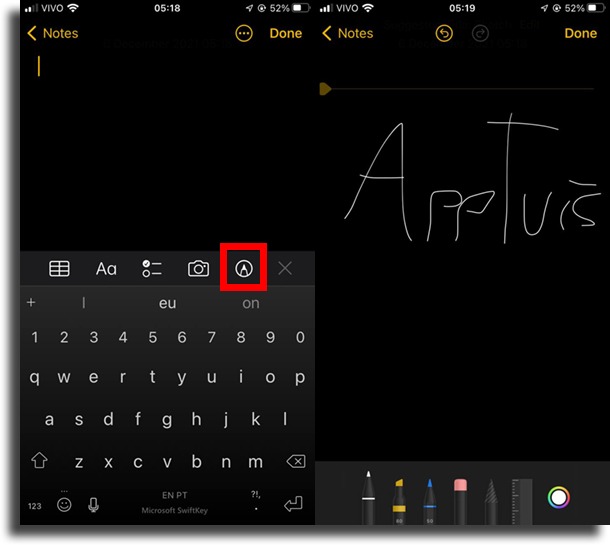
Did you know that you can also draw in Apple Notes? First of all, click on the pen icon located in the menu above the keyboard. There you will find several pen options and different colors. It is possible to continue writing texts normally in the spaces above and below after finishing the drawing. In addition, by tapping on the drawing, it is possible to open a menu that allows saving it as an image on the camera roll.
What did you think of what’s new in Apple Notes?
Have you used this app before? Are there any features we’ve listed that you didn’t know about? Tell us in the comments!


